
UPDATE:
January 11th, 2022
Several commenters alerted me to the fact that, since a recent update, the original set of instructions can result in truncated highlights and annotations once exported (i.e., incomplete text where only part of the highlight is present followed by “…”).
Here are instructions for a workaround using Calibre and the Annotations plugin. Unfortunately this doesn’t result in a neat little .txt file like the other method, but it does get your annotations onto your computer where you can copy and paste them. Once again, I have a Mac, so it may be a bit different if you’re running Windows. I’ve kept the original instructions for the first exportation method at the bottom of this post in case it starts working again.
1. Download Calibre if you haven’t already.
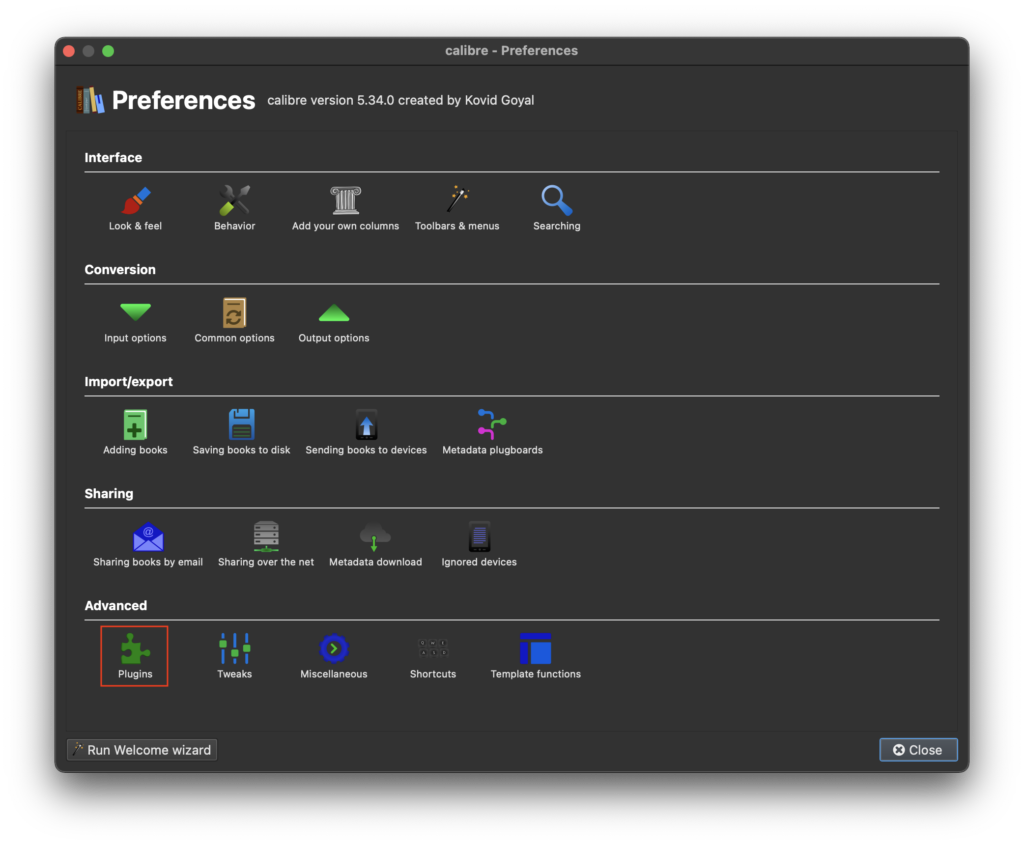
2. Go to the top bar and select calibre > Preferences > Plugins (under the Advanced heading).

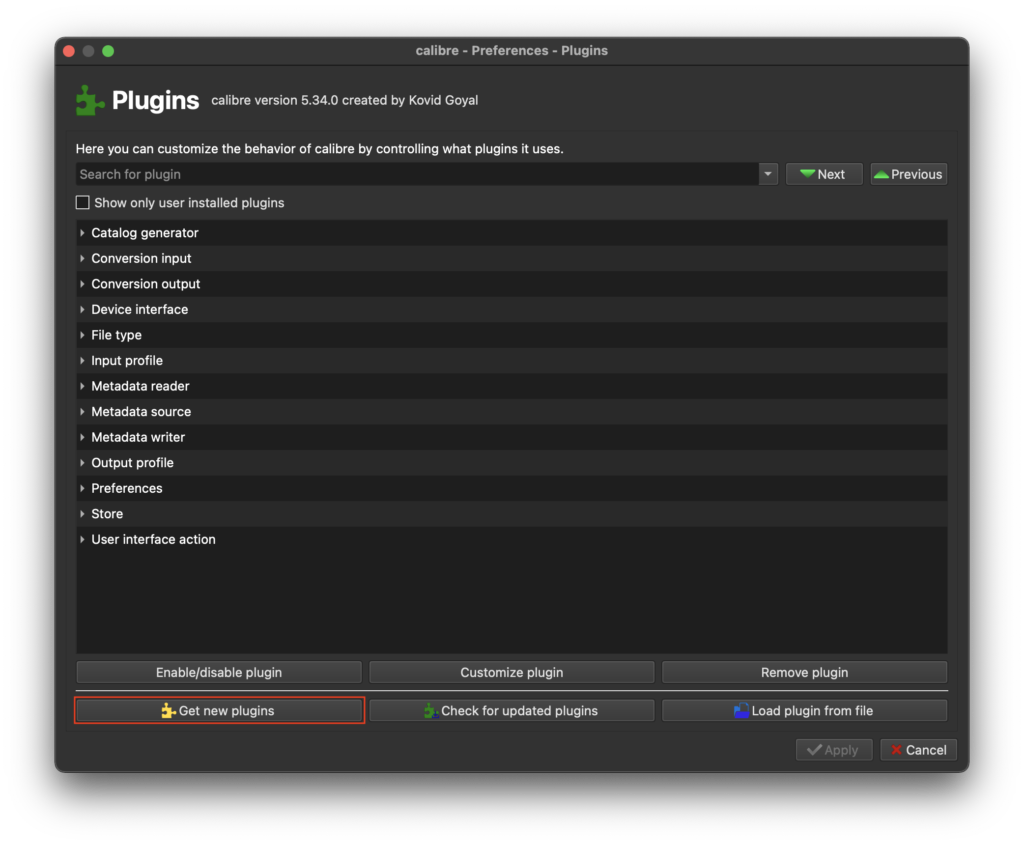
3. Click Get New Plugins.
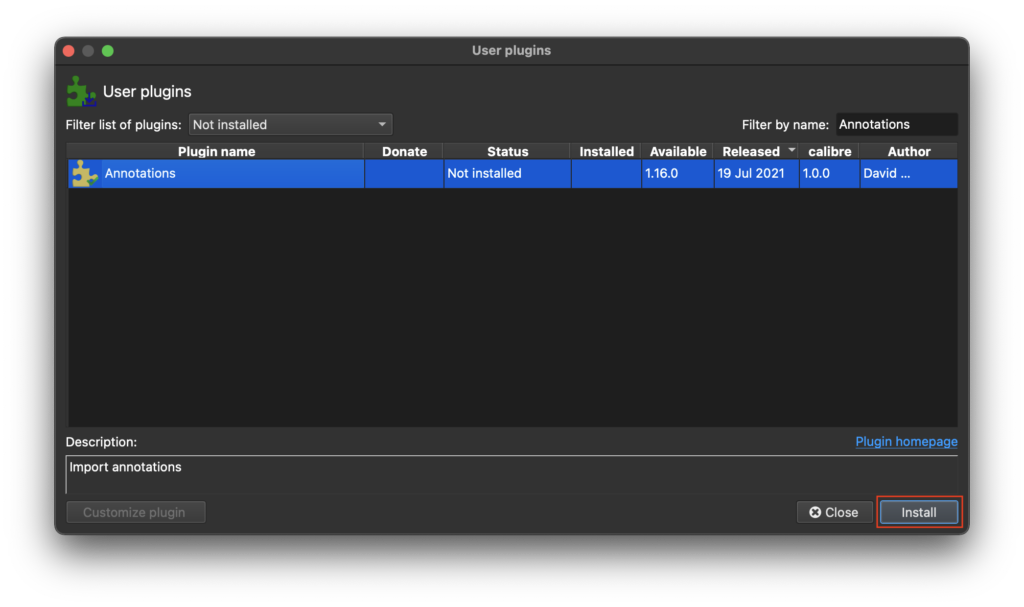
4. Click into Filter by name and type “Annotations“.
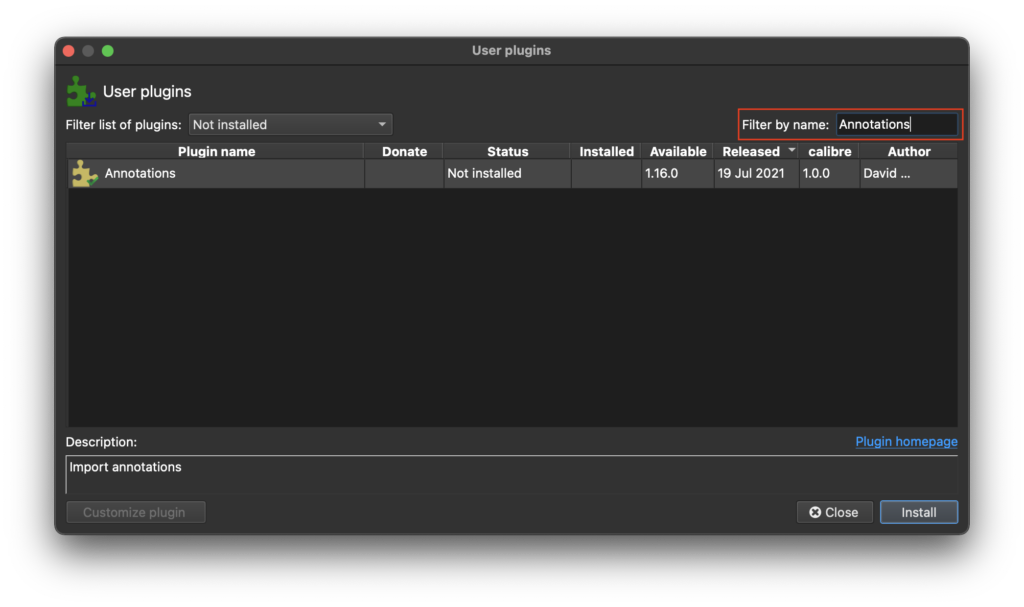
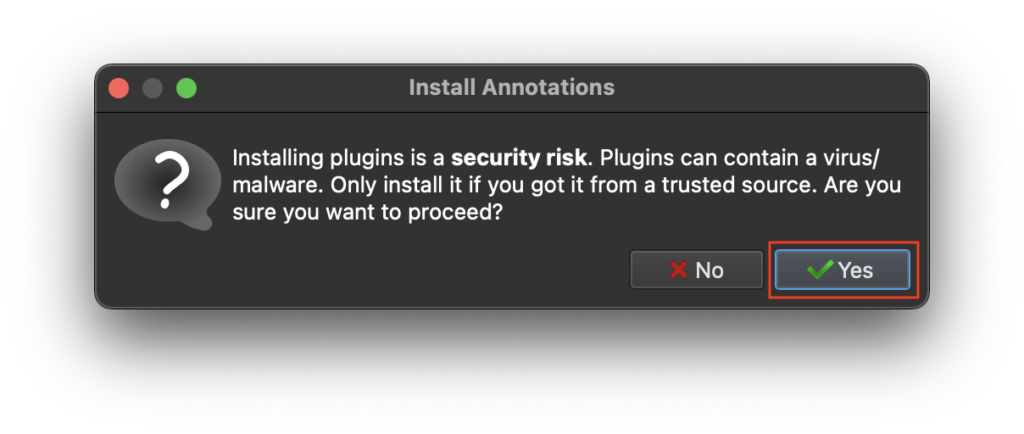
5. Select the plugin and click Install. A warning will pop up. Select Yes.
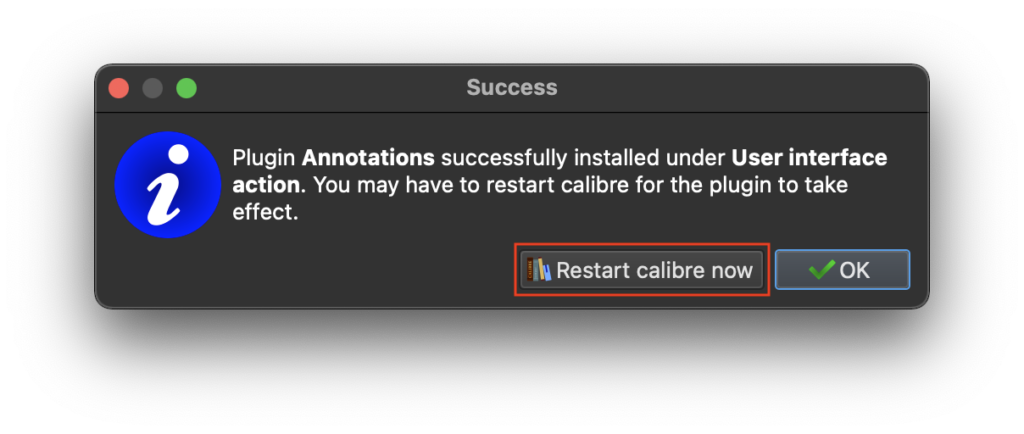
6. Restart Calibre.
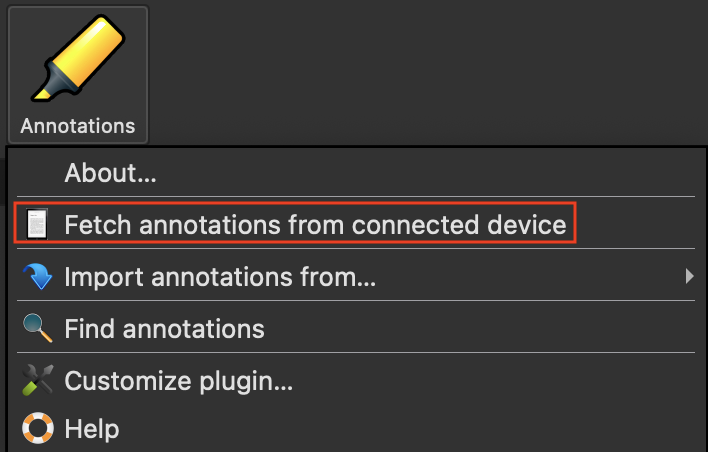
7. You should now see the Annotations plugin on the right side of the header bar. Open it and select Customize plugin…

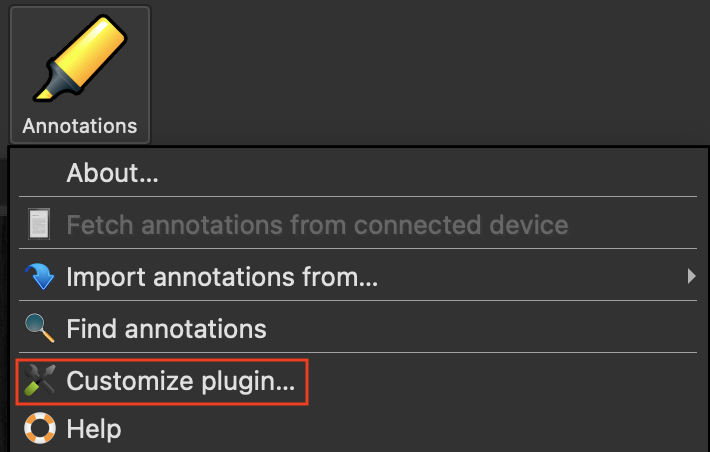
8. Open the Wizard by clicking the wand button.
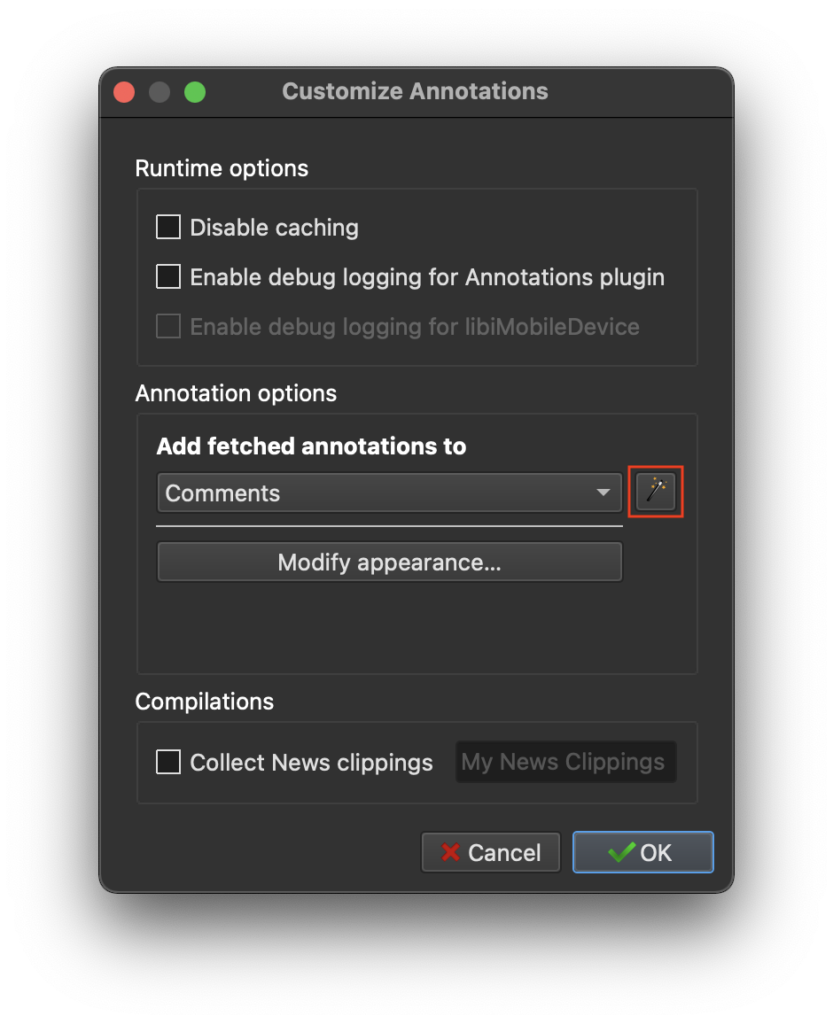
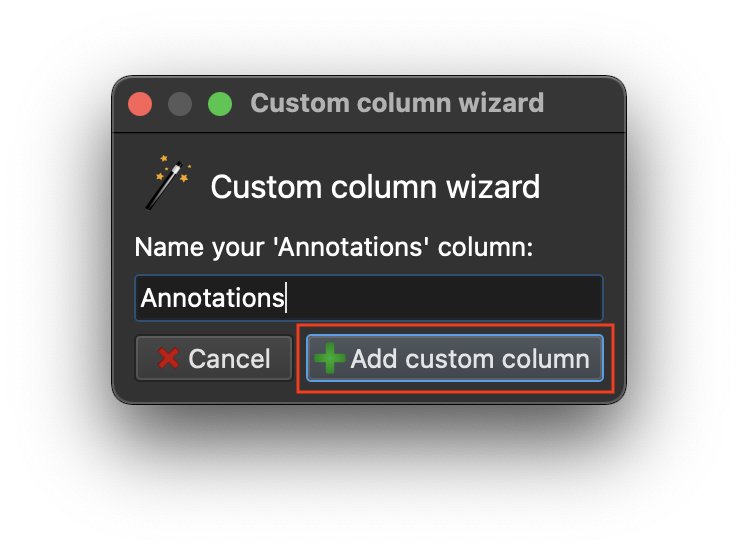
9. Type “Annotations” and click Add custom column. By default, the annotations will appear in the Comments column once exported. This step ensures that there is a dedicated Annotations column.
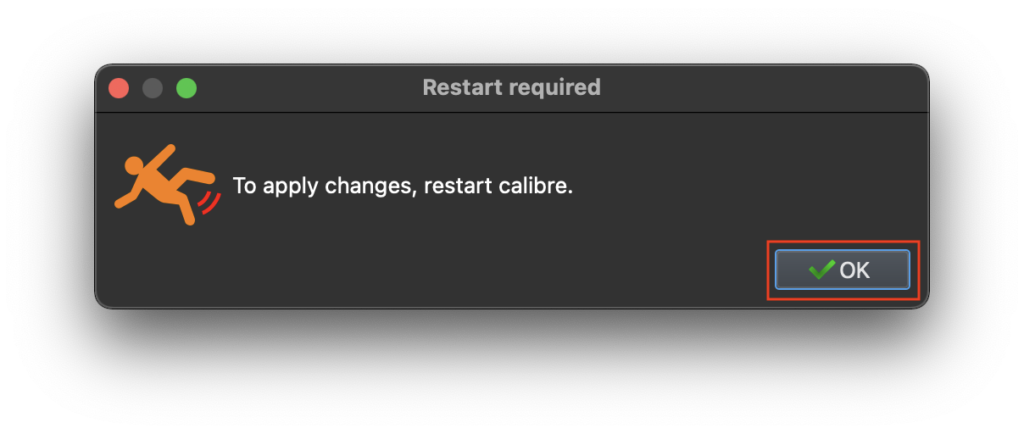
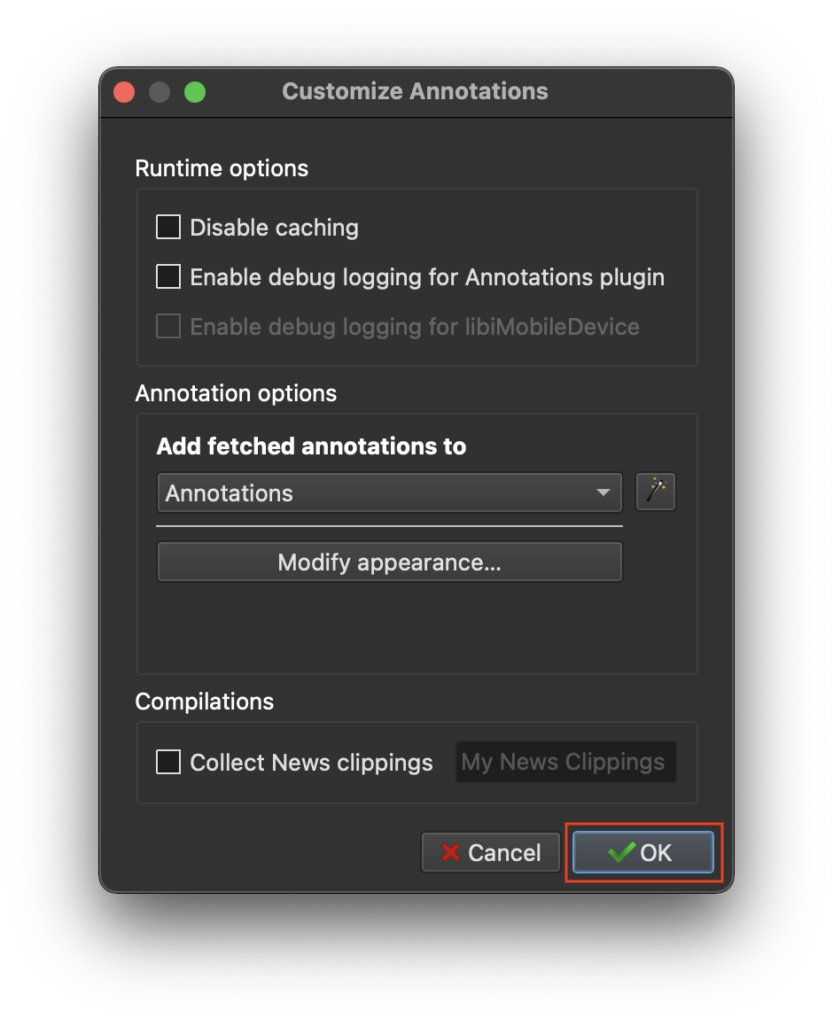
10. Click OK on both of the dialog boxes shown below and then restart Calibre.
11. Connect your Kobo device to your computer via the appropriate cable.
12. Open the Annotations plugin and select Fetch annotations from connected device.
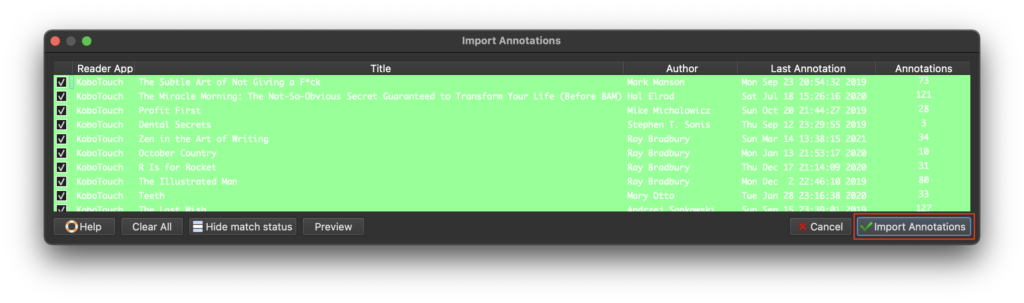
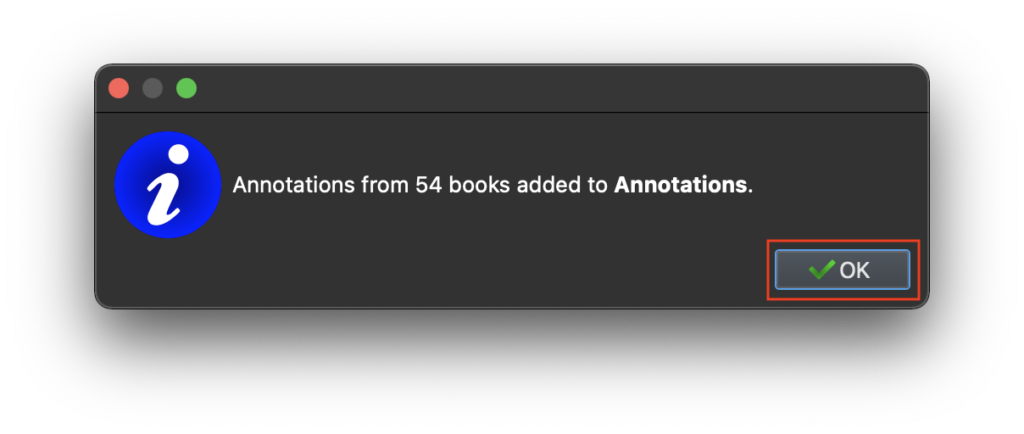
13. At this point you can select which books you want to export annotations from. By default all books will be selected. Click Import Annotations once you are ready. Click OK.
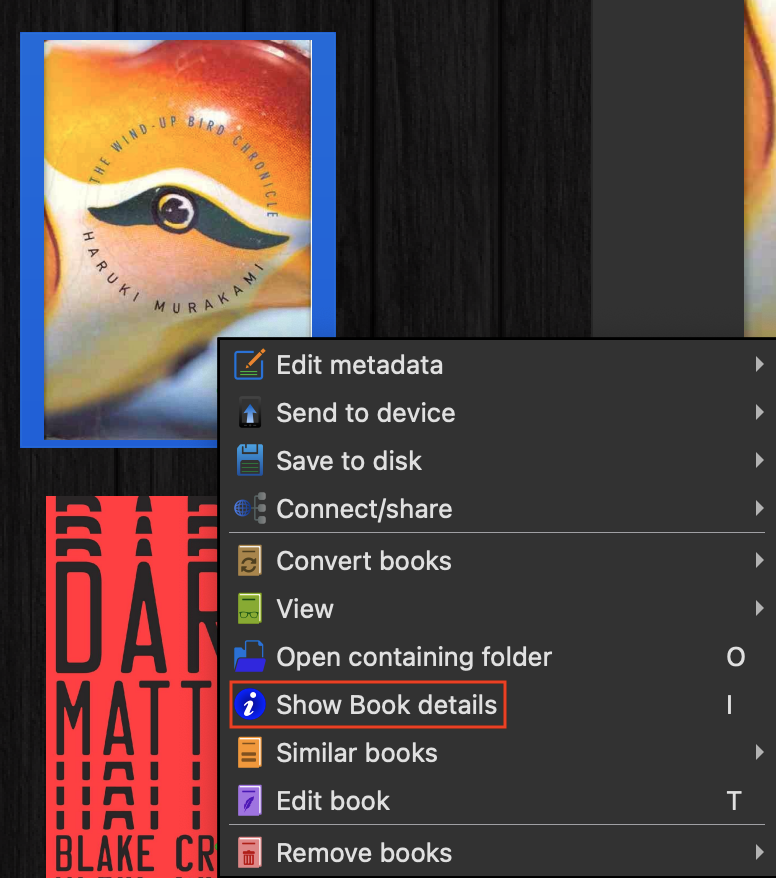
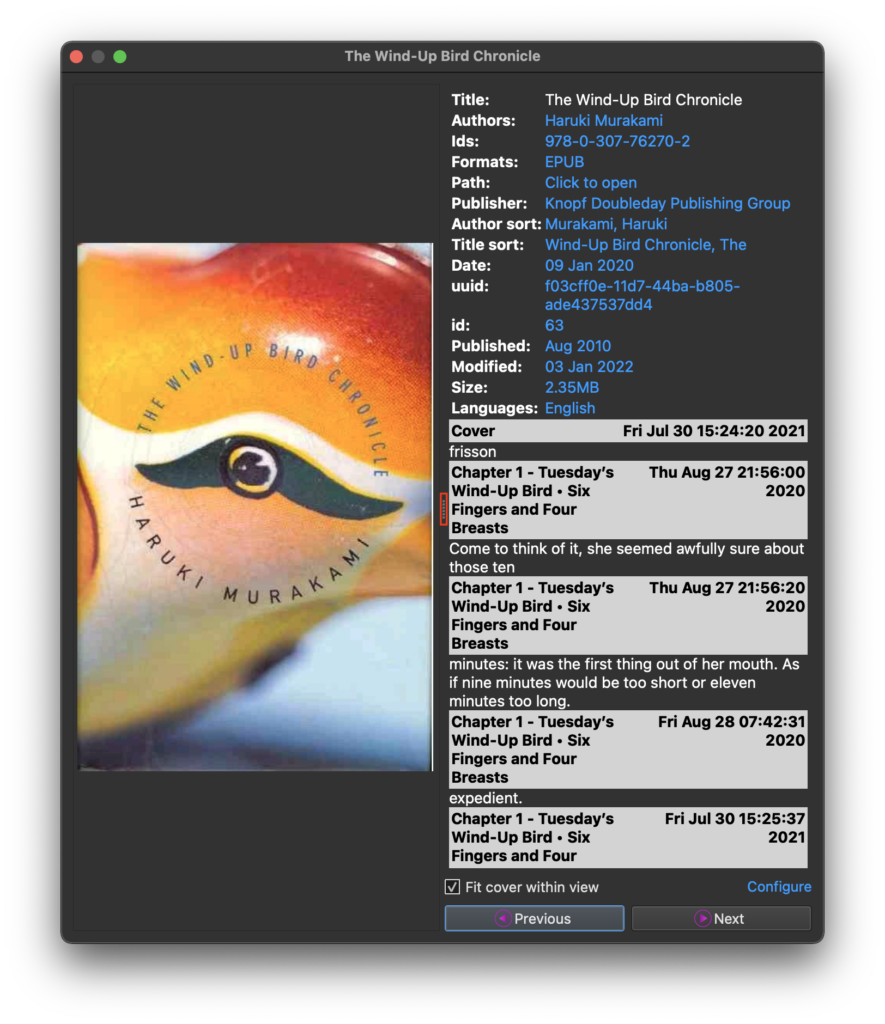
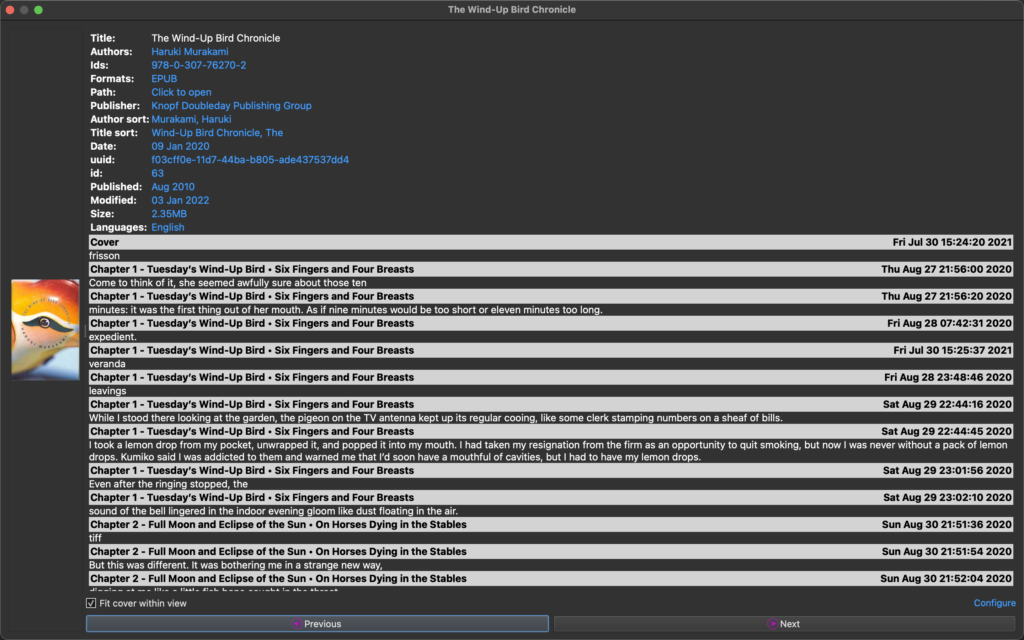
14. Now when you select a book, you should be able to see the annotations. I like to right click the book and select Show Book details for a larger view. You can also hit the ‘I’ key to bring up the book details.
Here is the link for the discussion regarding the plugin if you have any concerns.
https://www.mobileread.com/forums/showthread.php?t=241206
I will continue to search for alternatives and update this post with more information.
If you find any other solutions, please add them in the comments and I will look into them. I hope this is helpful!
old instructions
If you have a Kobo and you’re hoping for an easy way to export your highlights and annotations so you can view them in a .txt file on your computer, look no further! Below I’ve listed the steps for accomplishing this, and the beauty of it is that you only have to do this once and then your Kobo will always have the option for you to export your highlights and notes! It baffles me that this isn’t just built into the Kobo from the start.
the why
When you follow the instructions below, the result will be a compilation of your highlights and annotations in a .txt document which you will be able to access in the Kobo device folder once you connect your Kobo to your computer.
Up until today, I was literally re-typing all of my highlights and annotations, which was a very painful process. My fingers would get tired and I wouldn’t have time to write my blog post in the same session. Well, no more! This is much more time-efficient and allows me to spend more time writing my actual blog posts.
I looked up how to do this a couple of times, but I was really confused because I couldn’t see the files other people were referring to in their instructions. I hope that the instructions I’m sharing are a bit more clear and that the screenshots make the steps easy to follow.
if you have a mac
Please note that your Mac hides sensitive files which when messed with can really screw things up. But no need to fear: you can easily enable and disable the viewing of these files so that you don’t accidentally mess with something you shouldn’t. I’ve included how to do this in the instructions as well.
The below instructions are specific to Mac, but the steps for Windows should be fairly similar. I’m running macOS Catalina 10.15.7 at the time of writing this post.
the how
Here are the precise steps that allowed me to set up the system for exporting my highlights and annotations from my Kobo device:
1. Connect your Kobo eReader to your computer via the appropriate cable.
I use the cable that came with my Kobo along with a dongle which turns the USB-A end into a USB-C end that I can plug into my laptop.
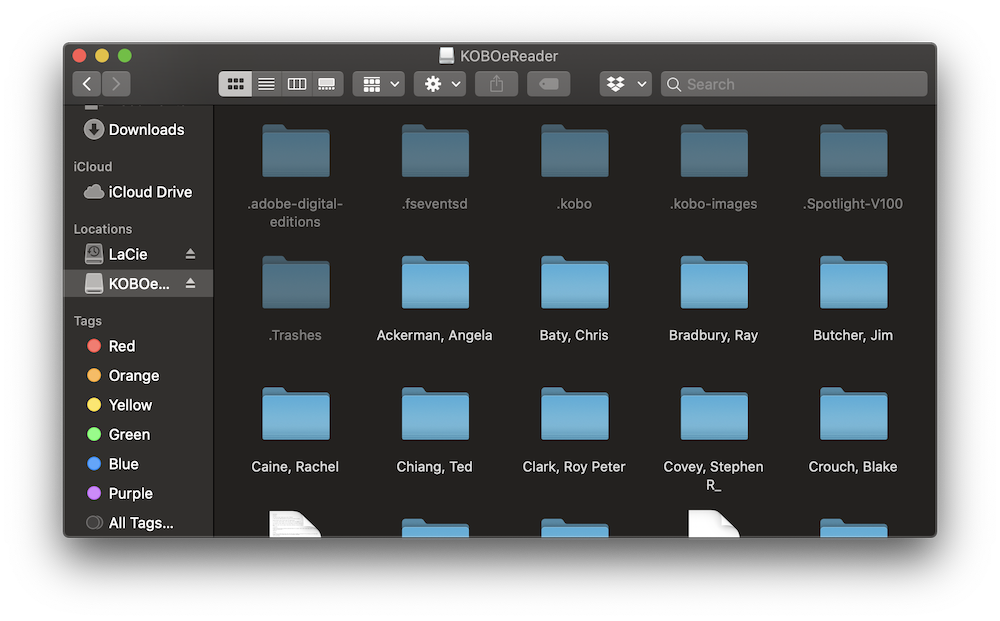
2. Go to the Kobo device folder.
Mine is called KOBOeReader, which I believe is the default (but I will refer to it as the device folder going forward as yours might be named differently). If you’re using a Mac, the folder might appear on your desktop. If not, it will probably be in the Finder side bar under the “Locations” heading, or you can search for it in Spotlight.

3. Press [Cmd + Shift + .].
Yes, those are the command, shift, and period keys! This should unhide the hidden files.

4. Open the “.kobo” folder which has appeared.
It was probably hidden until the last step. If you don’t see it, repeat step 3 as you may have accidentally hidden it.

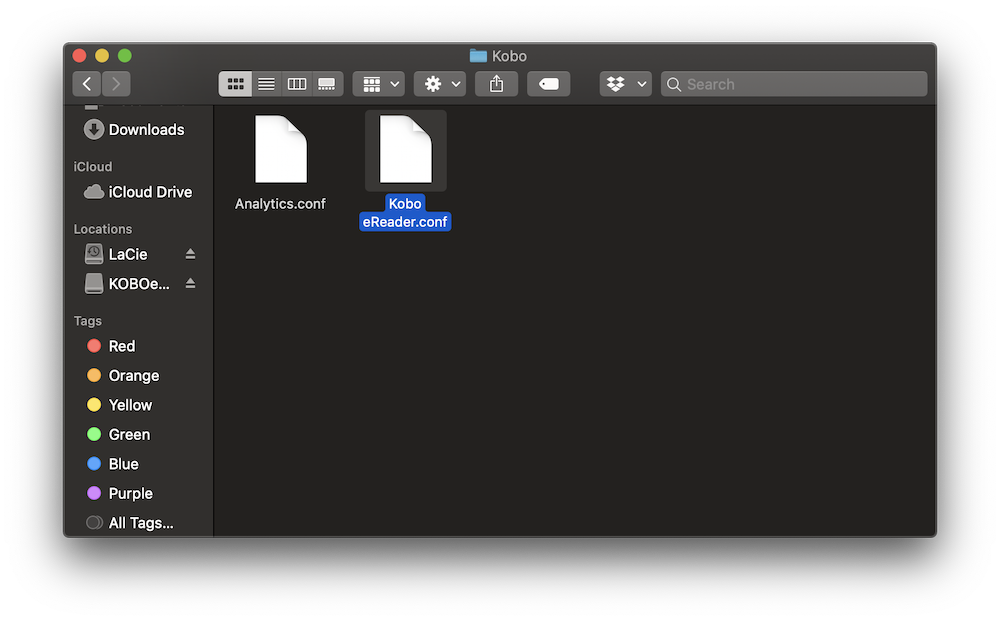
5. Once you are in the “.kobo” folder, open the “Kobo” folder inside it.
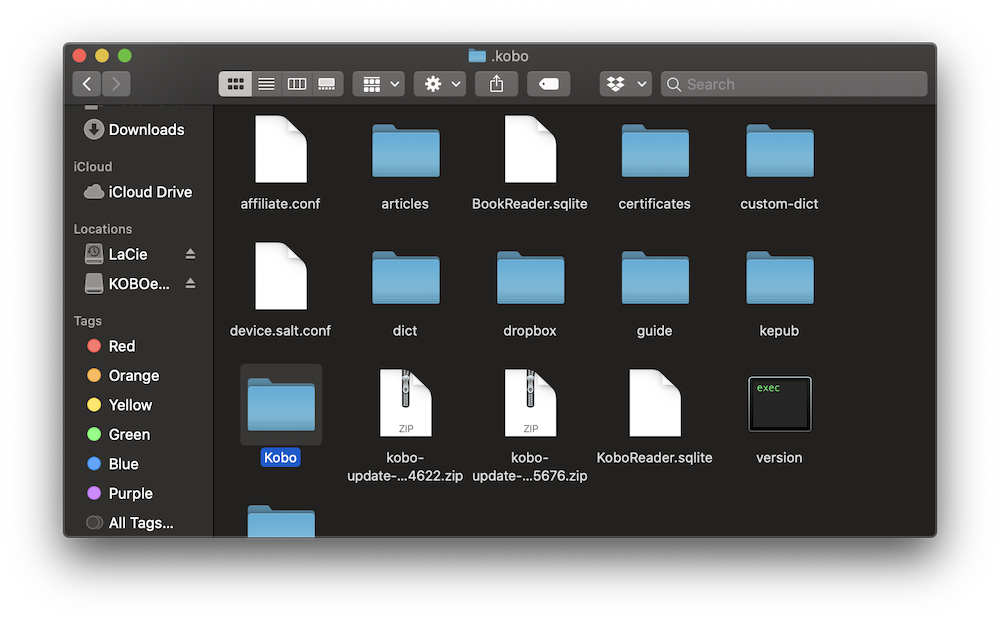
6. Inside the “Kobo” folder you should find a file called “Kobo eReader.conf”.
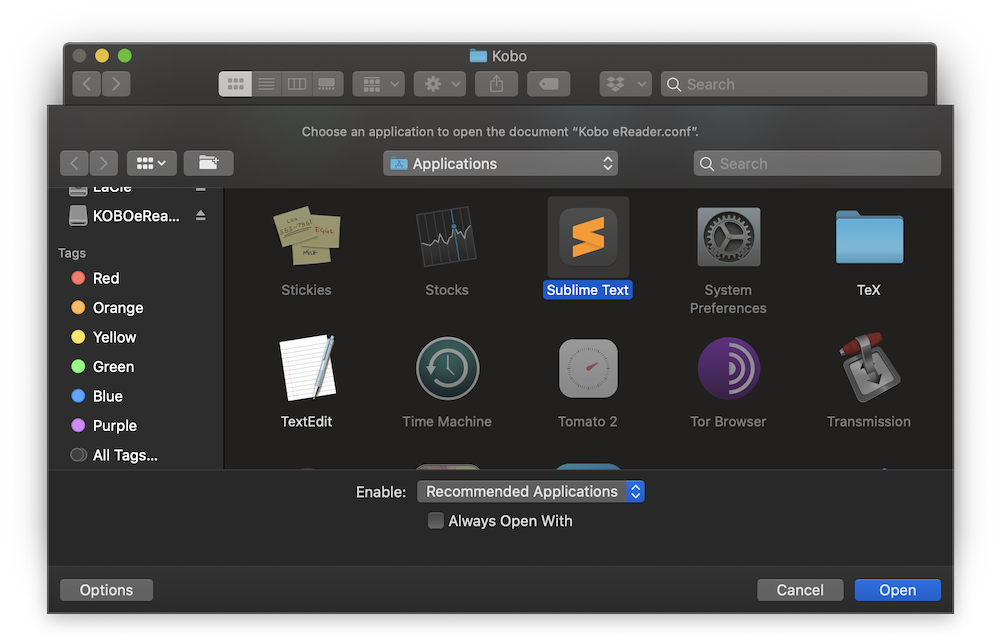
Open this with your text editor of choice. I used Sublime Text, but you can also use TextEdit which comes with your Mac. You may have to right-click and select “Open With” and choose the text editor that way. You can also double-click on the file and click “Choose Application…” if you’re having trouble.
7. Add the following two lines of code (anywhere not under an existing heading; at the very end of the file is safest), making sure that they are indeed on two separate lines:
[FeatureSettings]
ExportHighlights=true
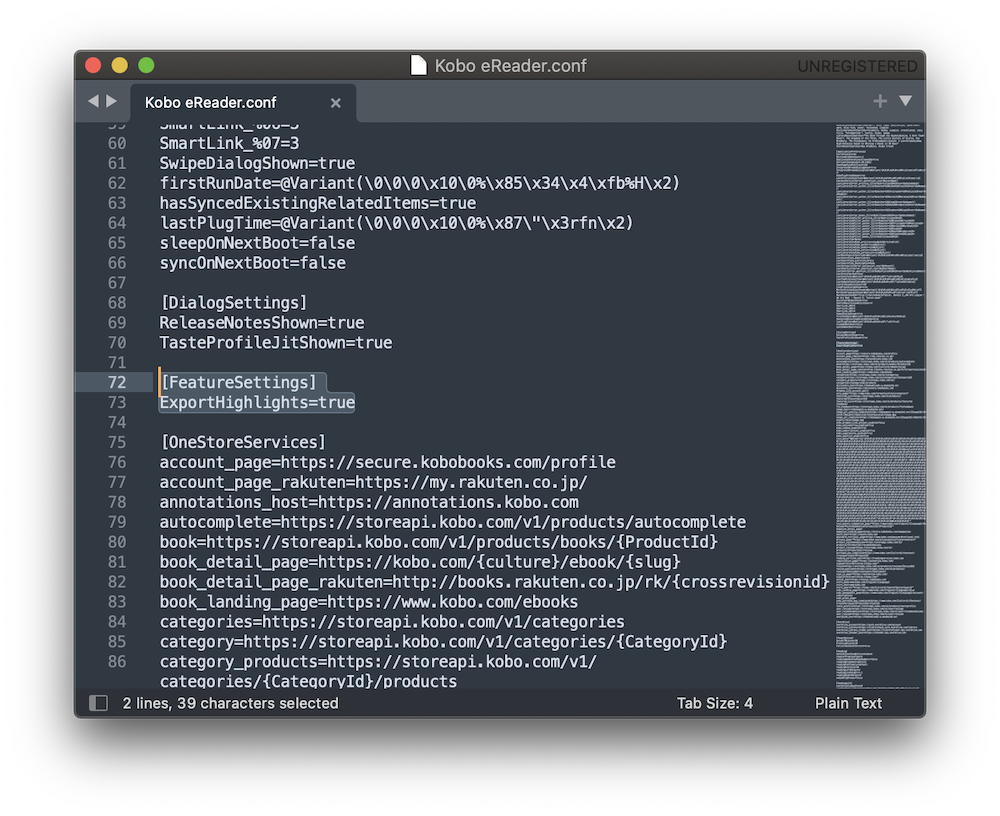
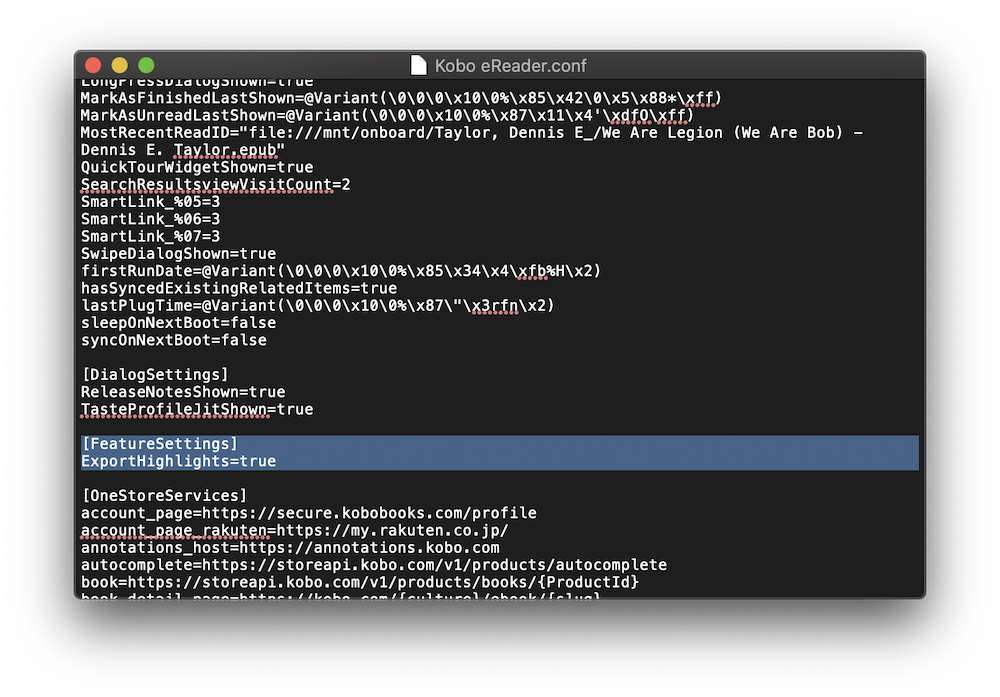
8. Save the file, ensuring that you save it as .conf and not as .txt.
9. Return to the device folder, where you can press [Cmd + Shift + .] to once again hide the sensitive files.
10. Safely eject your Kobo from your computer.
Right click the desktop icon and select “eject” or go into finder and click the eject button beside the name of the device folder in the Finder sidebar.

11. Now when you touch and hold over a book on your Kobo, you will see the option to “Export highlights”.
This will prompt you to select a file name and save a .txt file in the root directory of the device.
12. Next time you connect your Kobo to your computer, open the device folder again and you’ll see the .txt file(s) you generated.
It’s that easy!
As always, feel free to discuss in the comments below or reach out via the contact form. I’d love to hear from you!
If you enjoyed this post, please consider subscribing to my email list by clicking the button below:

I’m planning to update the post in about a week with some potential solutions for the truncated highlights & annotations issue some of us are having. If anyone finds any solutions before then, please leave a comment here or shoot me a message (on the contact page) so I can add it to the update!
The post is now updated with an alternate method using Calibre and the Annotations plugin. It’s not a perfect solution, but it will enable you to copy the annotations from Calibre and paste them wherever you choose. Again, if you find any alternate solutions, please add them in the comments or send me a message via the contact page and I’ll add them to the post!
Hi everyone! 👋 I’ve built a free web app for Kobo users that makes exporting highlights and notes super easy. No software installation or scripts required—just connect your Kobo device, visit https://kobo-up.runawayup.com/, and you’re good to go!
As a fellow book lover, I created this tool to simplify the process of managing annotations. I’d love for you to give it a try and share your feedback. Your insights will help me make the app even better! 🙏
Happy reading! 📚
Hey! Thanks for sharing this guide. It, in part, pushed me to get the Kobo Libra Colour.
However, with the update the other day to FW 4.41.23145, I can’t generate a ,TXT file.
Do you happen to have the same setup?
EDIT: This still works (FW is not the problem) It’s now just in a folder called “Exported Annotations”. A Redditors guide here
Thank you so fuckin much sit
Thanks so much! With your excellent explanation you’ve saved me hours and hours searching for a solution and extracting the annotations.
Used the Mac method to extract my highlights from Library books. Worked perfect. Thanks so much
Hello,
for people using AZERTY then the shortcut to show hidden file on Mac is
COMMAND + SHIFT + Fn + .
Good to know! Thank you for providing that information.
Hi!
Thanks for the great job.
Do you reccomend any kobo device as the best to make annotations? All of them have that possibility of taking annotations and highlights?
My goodness! Sorry for the super late reply (I didn’t get a notification for some reason). Any kobo device should do as far as I’m aware. Glad I could help!
Thanks a lot, this actually works! I’m having the same issue though regarding the truncated highlights followed by ‘…’. Another thing I had with one book (so far, still some 80 to extract): it puts all the highlights -let’s say 50- in the txt-file but afterwards when I compare that file with the Kobo version on my Macbook (a synced copy of my e-reader) there’s only 10 highlights left in the book compared to the extracted txt-file… so still a little buggy here and there but already way more useable than collecting screenshots :-). I’ll check regularly here to see if there’s a possible update that remedies these bugs, thanks again!
Hi Dirk! I wrote an update at the top of this post. It’s not perfect, but it at least gets you to a place where you shouldn’t have truncations anymore. Let me know if it works for you!
Hi Janine, thanks, appreciate your continuous efforts to solve this truncation problem! I followed all the steps described above, everything went well until I came to ‘fetch annotations from connected device’ and I got the message ‘unable to find any annotations on Kobo Aura H2O Edition 2 matching books in your library’. Everything’s connected correctly, there’s some 80 books on my Kobo (duplicated on my laptop Kobo Desktop Edition as well). Maybe that I have to put Calibre on another location in my Library…? Th eprogram created a default map on installing with the added message that I always should create a new map upon installing & using Calibre for the first time.
Just to make sure it’s not a software bug or incompatibility: I’m still on High Sierra 10.13.6 as that is the latest OS that supports both 32 & 64 bit plug-ins (which formats I need both for music production) and therefore I had to install a previous version of Calibre (3.48). But I guess that’s not the problem as I could install the plug-in and it actually sees my Kobo. Thanks again for your reply!
… and just adding this thought following my recent reply: I suppose it’s not an linguistic misunderstanding here and that the term ‘annotations’ also covers ‘highlights’? I didn’t actually write notes in my Kobo books, only highlighted a lot of passages.
Hi Dirk,
Unfortunately I haven’t been able to replicate this issue on my end, so I’m not sure why this would be happening. In the meantime, you could also try Kobonotes to see if this tool would suit your needs. I haven’t gotten around to doing a review of it yet or trying it out much myself, but it might be another solution. They have an FAQ that explains how to use it.
Let me know if you have any luck there!
Hi Janine, thanks for your reply, I might give this a try. Or maybe just stick to your first solution and manually add what’s been truncated in the highlights… not the most hi tech way to go, but likely the one with the least headache :-). Saying this because I probably have to tackle another issue first: of all the books stored on my Kobo device I can only see some freebies (in pdf) upon opening its database but none of all the other books… while at the same time it holds exactly the same books & annotations as in the Kobo Desktop on my Macbook ànd communicates with the Desktop version e.g. when I change an annotation on the e-reader it shows in the desktop version. I’m probably in the zone ‘database corrupt, re-install everything’ on the e-reader but I’ll deal with that later and keep on reading Joseph Roth’s Radetzky March for now :-). Thanks again for your kind support!
Many thanks, man!
Really helpful.
The next step is to be able to do this via wifi! 🙂
Thanks for the instructions!
It worked well for me until recently I found the highlights were not complete in my annotation text files. The text files were automatically saved in a separate folder named “Exported Annotations”, the highlights would end somewhere with “…” instead of the whole sentences. Have you come across this issue and do you have an idea how to resolve it?
That is most unusual – I can’t say I’ve come across this issue myself, but I will certainly look into it! I wonder if it’s associated with a recent update. I’ll report back if I find any solutions.
I just tried this on a Kobo Clara and found the same issue. I can get an Export Annotations option on my Kobo but then the highlights in the files all end after a couple of lines with “…” Would love a fix if you manage to find one!
I’ve found a potential workaround – will update the post in about a week!
Hi Anna! I wrote an update at the top of this post. It’s not perfect, but it at least gets you to a place where you shouldn’t have truncations anymore. Let me know if it works for you!
Hi Cathy! I wrote an update at the top of this post. It’s not perfect, but it at least gets you to a place where you shouldn’t have truncations anymore. Let me know if it works for you!
Thanks a lot. I read these instructions on another website but it wasn’t as clear as yours. You did mention that the code must be added in 2 separate lines instead of 1 like I did before. I was successful right at the first time!
No worries! I wrote this post precisely because the instructions weren’t nearly as clear on other websites and it was super confusing. I’m so happy it worked for you!
This is so great! Thank you!
No problem! I’m so happy it was useful.
Thank you for this, it’s a lifesaver!
I was actually taking snapshots of the Kobo screen and adding those to Notion, but this is so much better.
You’re very welcome! Glad I could help.